For my final fieldwork project in outpatient pediatrics, I was searching and searching for something that would really leave a mark, something that all of the kids would LOVE. I also knew that I didn’t really have sewing skills and my craft skills were limited (most projects include some sort of creation). What in the world was I going to do?!
Luckily, I came across a post by Katy and Zucchini that showed how to turn an IKEA table into a light table! WOAH!
**Keep in Mind** I used some of their ideas, but adapted it to make it more OT, fit various sensory preferences and needs, and make sure it was really engaging. I also wanted to stay away from having multiple edges or anything sticking up.
What You’ll Need:
I searched the internet for HOURS to find the cheapest, and still, quality products that I could find that wouldn’t take forever to arrive. Here’s what I came up with (the bright blue text are the links):
- IKEA LACK table (this comes in white, black, black-brown, or yellow for customization purposes!)
- Acrylic sheet in Translucent White – #2447 (dimensions cut to 21 5/8″ x 21 5/8″)
- (I used this one and they CUT IT FOR ME FOR FREE!!!) Even after shipping, this is the cheapest pre-cut option I found and they shipped it to me fast for a custom order!! Mine was 1/8″ thick to keep the price down, but you could also get this one for a thicker top (1/4″).
- I also chose a sheet that covered the whole table top! That’s VERY important for pediatrics practice or if you have any potentially impulsive kids running around. Nothing sticks up and there’s only one edge to worry about!
- Epoxy (I used exactly one bottle of this)
- LED flexible, color-changing, string lights (As a bonus – THESE CHANGE TO SOUND (voices and music) and got to me in *one* day. They also can change brightness levels, no matter what mode it’s in.)
- Drill (and 1/2″ drill bit)
- Pencil
- Painter’s tape
- 2″ diameter carpenter square (I found one at Home Depot in the tools section)
- Box cutter or utility knife
- Sandpaper
- Flat paintbrush
- White spray paint
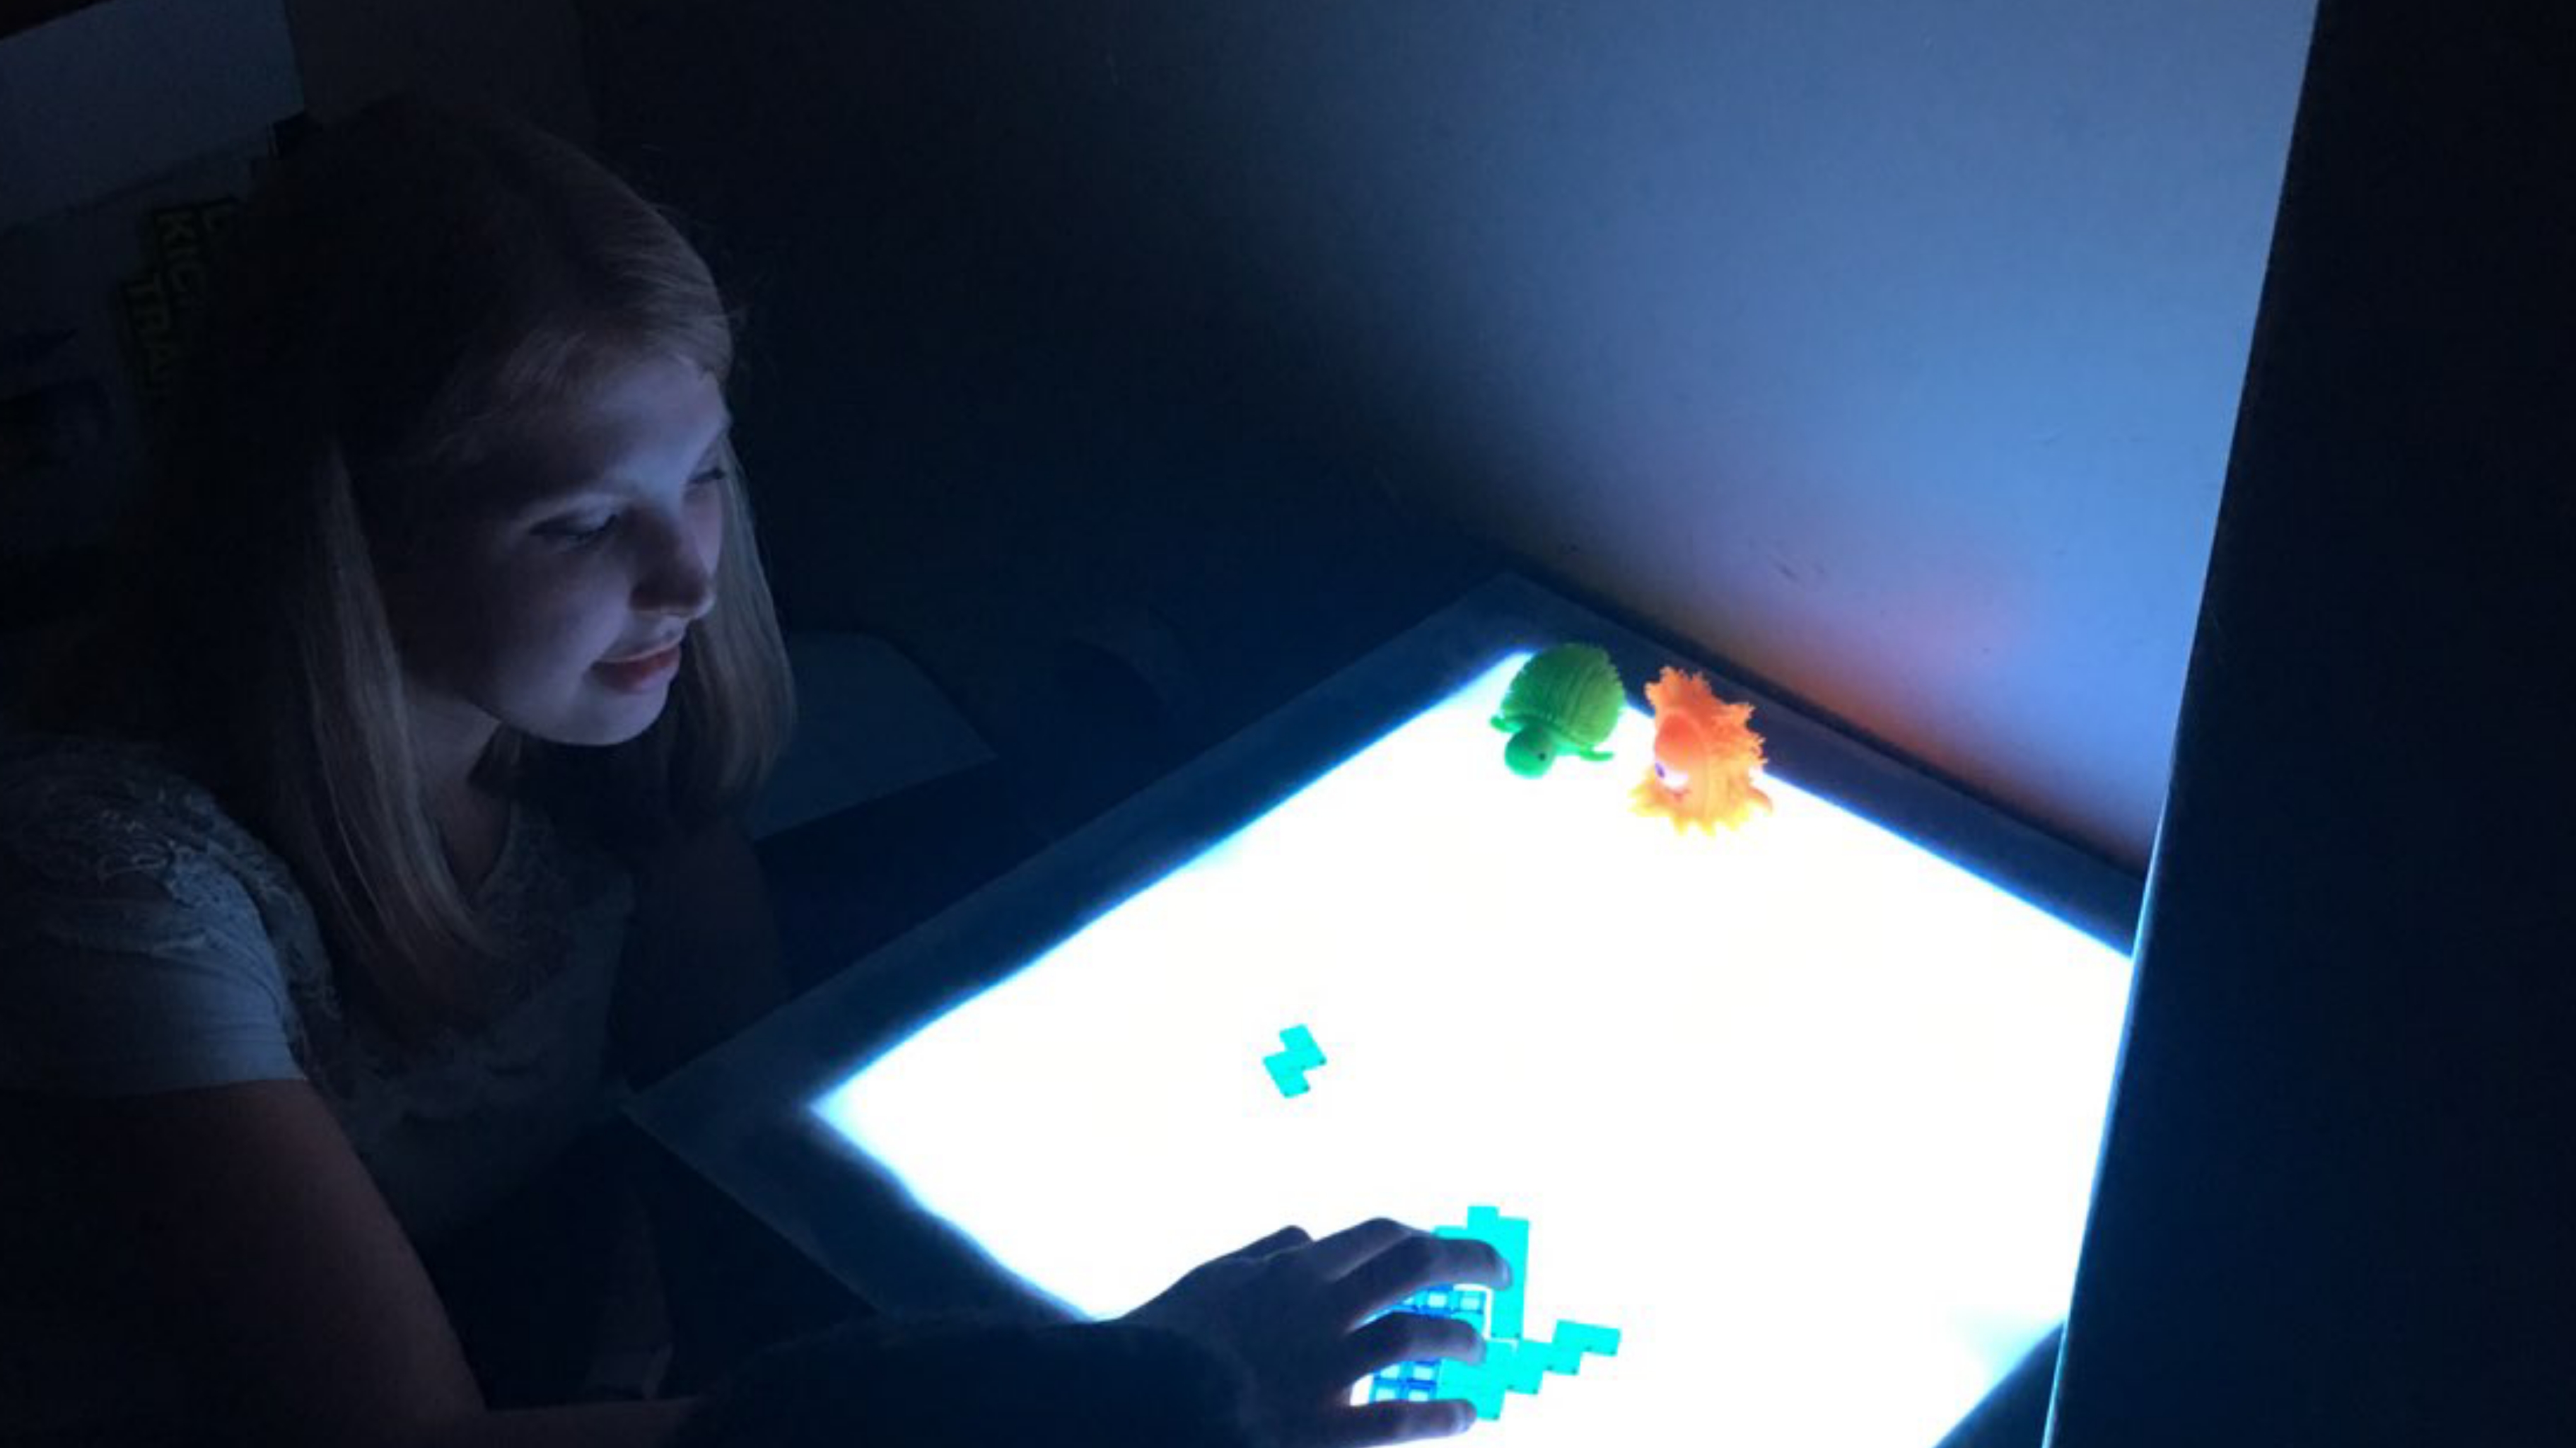
All in all… the total rounds up to be about $70. NOT TOO SHABBY considering light tables are sold anywhere from $200/$300 to $600 and the others don’t change colors or brightness levels that I’ve seen. That feature is important for finding the just right fit for each child’s needs and sensory preferences! (I’ll expand on the uses of those features in another post + some treatment ideas with the light table!)
How To Make It:
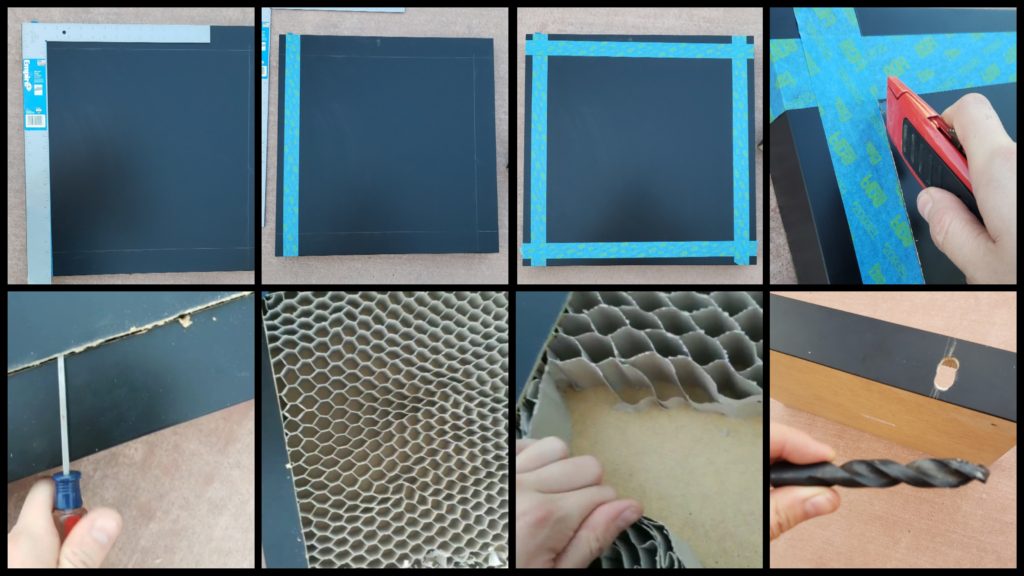
Prepping the Outside
(pictures below)
- Unpack the table and separate all of your materials. Leave the protective cover on your acrylic sheet until you’re ready to use it!
**P.S. It’s up to you whether you want to assemble the legs before or after this prep. I did it after! I placed the table top on the ground so I knew it was extra sturdy while working/cutting.** - Use the 2″ diameter square, and line up at the edge of the table. Trace the line with the pencil. (2″ from the edge is important because you’ll run into extra posts in the corners if you cut less than that!)
- Use the painter’s tape to frame the lines (for an extra visual barrier to ensure you don’t accidentally cut over the line)
- With the utility knife, cut along the line all around the table. You’ll have to cut through a thin sheet of laminate & particle board, however you’ll have to put a little elbow grease into it. I went over the same line four times and cut a little deeper each time. (I was sweating a bit! I was also outside!)
- Once cut, use a flat screwdriver or the utility knife to pry up the board you just cut. Be careful not to puncture the line you just made (like I did a bit… oops!) Learn from my mistakes, everyone!
- Use knife to cut a slice in the honeycomb cardboard, then pull it out. It comes out pretty easily with a slight bit of force! Make sure you clear out underneath the border, too! Sand the inside bottom to get rid of any excess cardboard. A little residue is fine as long as it doesn’t impede the lights.
- Sand the inside edges where you just cut to even it out and get rid of any rough edges. (It’s safer for you while prepping the inside!!)
- Drill a hole in the corner of one of the sides for the light strip to go through. I drilled two holes next to each other to make a bigger hole since I didn’t have a bigger drill bit.
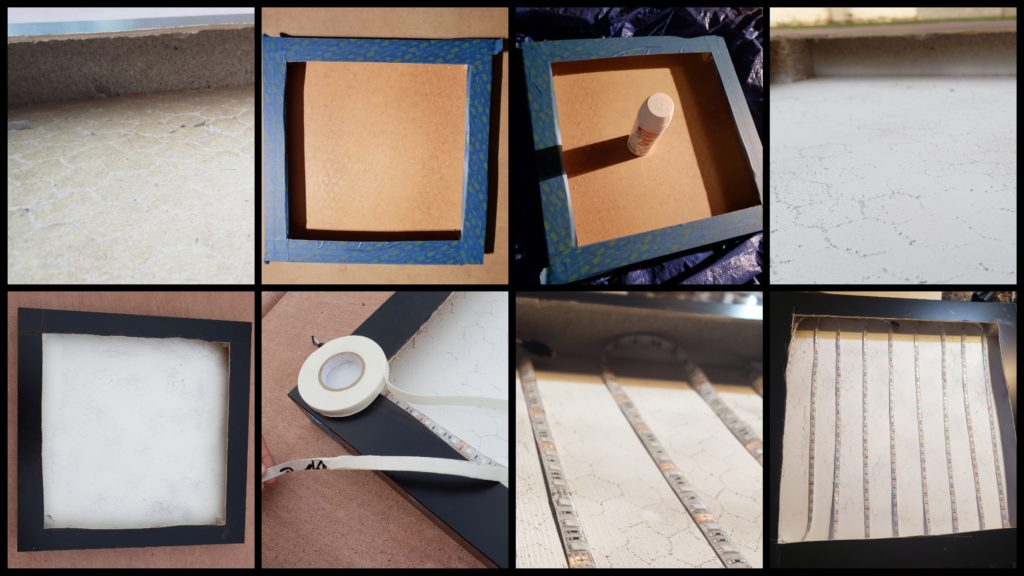
Prepping the Inside
(pictures below)
- Add painter’s tape to the rest of the top (outside borders) to prep for spray paint.
- Paint the inside of the table white. I used spray paint for quick dry and full coverage. This is important for allowing the lights to reflect. I’ve also heard of people using foil. I didn’t try that, so I can’t say how that works.
- While the paint is drying, plug in the LED strip and make sure it works! Test out the music features and get to know the remote a bit.
- Remove protective cover from bottom of LED strip and stick to the bottom of the table in a snake pattern. Make sure to start where you drilled the hole and push the cord out through the hole. If the sticky side of the LED isn’t sticking enough, use left over epoxy on trouble spots. The loops at the edges won’t stick down, but make sure the middle does so it all stays in place. You could also use double-sided sticky foam (for scrapbooking) underneath for a nice seal.
Putting It All Together
(I had to work so fast I didn’t take pics, but the final product is below!)
- Sand the top border of the table with sandpaper (to help the adhesive stick better!)
- Combine the two parts of the epoxy (resin and curing agent) on a disposable material. I used a paper plate. Use a paintbrush (you don’t mind throwing away) or a popsicle stick to stir.
- Remove one side of the acrylic protective sheet and remove a corner of the other side’s. Brush combined epoxy mixture in a thin layer along the edges of exposed sheet. Brush along the edges of the table, too, to help it stick better. (Warning: The faster you do this, the better the seal. I was able to do it in three minutes and it was sturdy!)
- Allow it to dry according to the instructions. I used clamps for 5 minutes then let it set for 30 minutes without touching it. It’s okay if it still looks wet (and blotchy) – left picture – it will go away after it is cured.
- With that being said, let it cure! For the one I used, the curing time was 24 hours.
- Assemble the rest of the table if you haven’t already!
- Remove the other side of the protective acrylic cover when you’re ready to use it!
- ENJOY IT!!!!
That’s it! The most amazing light table hack you can find!!! (I’m biased, but it’s true). This really only works with the IKEA table because it’s a hollow wood frame with cardboard inside. The light options make it that more excellent!
If you try it out, please let me know in the comments. I’d love to hear how it turns out and how you use it. Parents, teachers, OTs… so many people could benefit from a light table. It can double as an end table in the home as well! Share this life-saving, thrifty hack far and wide. As always, let me know if you have any questions or comments. I’ll share my light table treatment ideas and uses in another post soon, so stay tuned!